Pure Thyme

For a Balanced Life

  • Home
  • Pure Me
  • Pure Recipes
  • Pure Press
  • Contact Page

Let Them Eat Vegan! Review and Giveaway

April 5, 2013 By Jennifer


let-them-eat-vegan-coverDreena Burton is the author of four amazing vegan cookbooks and an at-home mom to three girls. Dreena has been creating vegan recipes for almost twenty years and has a tremendous selection of world-class vegan recipes. Let Them Eat Vegan! is her latest cookbook and sure to become a staple in every vegan kitchen – just like her earlier cookbooks.

Let Them Eat Vegan! is packed with 200 plant-powered recipes for the entire family. Dreena offers notes on how to modify her recipes for those with allergies or common substitution questions – which I find extremely helpful for when I am cooking for friends and family with dietary restrictions. I’m quickly discovering that Dreena really knows how to deliver wholesome, delicious and foolproof recipes. I haven’t tried a recipe in this cookbook that I wouldn’t make again. I could just throw in the towel with my recipe development and stock my pantry with Dreena’s cookbooks. I would never have to worry about serving up delicious vegan food again – her recipes are that outstanding! =)

The first recipe I tried was her – now famous – “No-fu Love Loaf”. This is hands-down the BEST vegan version of a “meat” loaf I have tried or attempted myself. Look no further than this recipe folks – this is “it”. My kids absolutely loved this and my husband couldn’t wait to make a No-fu Loaf Sandwich the next day – the perfect hearty meal for an “almost” vegan dad!


nofuloveloaf-500x333

No-Fu Love Loaf with Smashing Sweet Spuds, Rosemary Gravy, and Lemon Dijon Green Beans from Let The Eat Vegan!

(Photo Credit: Let Them Eat Vegan! Dreena Burton)

No-fu Love Loaf from Let Them Eat Vegan
 

Print

Many vegan versions of meatloaf are made with tofu, veggie ground round, tvp, or even seitan. Those tofu-averse will be happy to know there is no tofu or veggie meats in this loaf. This savory version uses only lentils, cracked wheat, oats, and chia seed, along with a mix of seasonings to make it all magically come together!
Author: Dreena Burton

Ingredients
  • Ingredients
  • ½ cup brown (green) lentils
  • 1 cup vegetable stock
  • ⅓ cup water
  • 1 dried bay leaf
  • ¾ cup bulgur (toasted cracked wheat) (for gluten-free version, use certified gf steel cut oats)
  • 1 cup water, boiled
  • ¼ cup natural ketchup
  • 1 cup rolled or quick oats (ensure gf certified for gluten-free)
  • 3 tablespoons tamari (use wheat-free for wheat/gluten-free version)
  • 2 tablespoons nutritional yeast
  • 2 tablespoons ground white chia (or can use flax meal)
  • 2 tablespoons vegan Worcestershire sauce (see note for gf version)
  • 2 tablespoons tahini or sunflower seed butter
  • 2 teaspoons blackstrap molasses
  • ¼ teaspoon dried thyme
  • ¼ – ½ teaspoon dried oregano
  • 1 teaspoon dried basil
  • ⅛ teaspoon ground fennel (optional)
  • Freshly ground black pepper to taste
  • Topping:
  • 3 – 4 tablespoon natural ketchup
  • 1 teaspoon vegan Worcestershire sauce (optional) OR 2 tsp vegan bbq sauce (optional)

Instructions
  1. Combine the lentils, vegetable stock, 1⁄3 cup of water, and bay leaf in a saucepan. Bring to a boil, then lower heat to medium-low, cover, and cook for 25 to 30 minutes, until just about tender. Once done, add the bulgur and boiling water, cover, and cook on medium-low heat for another 8 to 9 minutes.
  2. Meanwhile, preheat the oven to 375°F. Lightly oil an oven-proof glass loaf pan and line the bottom of the pan with a strip of parchment paper to cover (place it in to protrude along the short ends of the pan; this helps for easier removal of the veggie loaf from the pan).
  3. Combine the topping ingredients in a small bowl.
  4. Once the bulgur is cooked, remove the bay leaf and add all the remaining ingredients (except topping). Stir very well. Transfer the mixture to prepared pan and pack it in. Spread the topping mixture over the top.
  5. Cover the dish with aluminum foil and bake for 25 to 28 minutes. Remove the foil and bake for another 7 to 8 minutes. Remove from the oven and let stand for 10 to 15 minutes or so, before cutting to slice and serve. Serves 5-6.

Notes
Dreena’s Notes: Allergy-Free or Bust! Despite its not having any tofu, tempeh, or TVP, I cannot technically categorize this recipe as “soy free” because of the inclusion of tamari and vegan Worcestershire sauce. These are important seasonings in the loaf. That said, to replace the Worcestershire for a gluten-free version, use instead an extra 1⁄2 tablespoon of wheat-free tamari, along with an extra 1⁄2 teaspoon of molasses, and 2 teaspoons of apple cider vinegar. Savvy Subs and Adds: If you’d like to add some veggies to the loaf, try adding 1⁄2 cup of seeded and finely chopped green pepper, or 1⁄4 cup of finely chopped celery (stir into the mixture with the seasonings).

3.2.1230

Of course I also had to try one of her fabulous dessert recipes and I let the kids choose which one we should try. Berry Patch Brownies was the winner and it is the perfect, fudgy brownie treat that is bursting with flavor- delish!

DSC_0039

Chocolate and berries – can you go wrong with that flavor combo? I’m looking forward to serving these up warm with some vanilla ice cream later!

I’m cooking my way through LTEV this week and here is another fabulous recipe of hers for Double Chocolate Chippers. These cookies come out perfect and they are not overly sweet. I will definitely be making these again!

 DSC_0056

Check out Dreena’s newest e-book, Plant-Powered 15 on her website. I am so excited to check this out because all the recipes are whole foods, vegan and oil-free!

PP15cover

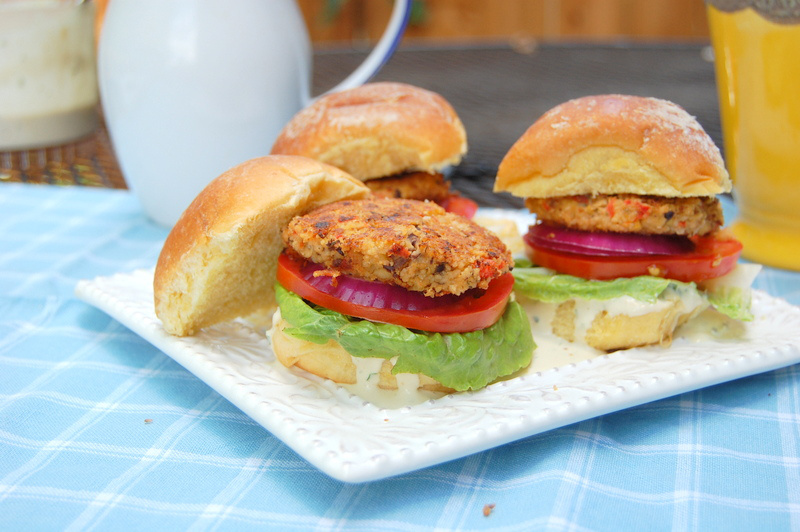
Recipes include: “Mac-nificent”, “Sticky Almond Blondies”, “Umami Sun-dried Tomato and Almond Burgers”, “Creamy House Dressing”, “Wonder Spread”, “Black Bean Soup with Sweet Potatoes”, “Almond Zen Granola”… and more! YUM!

If you are new to vegan cooking and are looking for your first cookbook to try, Dreena Burton’s cookbooks are a great place to start. Even long-time vegans will benefit from adding her cookbooks to their repertoire.

This giveaway is now closed…thanks to all who participated!

Now for the Giveaway…

To enter the contest, leave a comment telling me what’s your favorite vegan dessert recipe. Don’t forget to leave your contact information so I can let you know if you win. =)

BONUS ENTRIES

You MUST leave each entry as a separate comment or only one comment will count.

  • Like Dreena Burton Facebook and leave a comment on her wall.
  • Subscribe to Virtually Vegan Mama
  • Like Virtually Vegan Mama on Facebook and leave a comment on my wall.
  • Follow Virtually Vegan Mama (@virtveganmama) on Twitter
  • Tweet about this giveaway and tell me that you tweeted in the comments section; “I just entered to win Let The Eat Vegan! @virtveganmama”
  • Share this giveaway on your Facebook Page and tell me that you did so in the comments section
  • Pin it

All entries must be completed no later than Friday, April 12th 2013,  at 11:59 p.m. EST.

Winner will be announced on Saturday, April 13th 2013, on my blog, and the winner will also be notified via the email address they provided in the comments section.

Giveaway open to U.S. and Canada residents only. =)

Good Luck!

xoxo,

Jen

Let Them Eat Vegan! by Dreena Burton. Excerpted by arrangement with Da Capo Lifelong, a member of the Perseus Books Group. Copyright © 2012. www.dacapopress.com

Filed Under: Entrees Tagged With: cookbook review, entree, giveaway, healthy, holiday, lentils, recipe, vegan

Can you guess one of the first recipes I made with my new Vita-Mix?

September 4, 2012 By Jennifer

If your answer was Cashew Cream, you guessed correctly! =)

cashewcream

Of course, the first thing I made was a delicious, mouth-watering, smoothie with NO CHUNKS that made me so happy I jumped up and down in the kitchen for a few minutes! I’ve been waiting soooooooo long for a Vita-Mix. But, it was definitely not in the budget and we had a perfectly good blender that did the trick most of the time. Also, my Cuisinart was very capable of getting a pretty creamy cashew cream and other nice sauces. I knew though that once I got my hands on a Vita-Mix, it would change everything. The day my blender broke, my wonderful hubby just looked at me and said, “Let’s just order a damn Vita-Mix already.” I ran straight to the computer and had my order processed before he could rethink what he just said. I’m kind of laughing at myself writing this! I must be crazy to get so excited over a kitchen tool, but I love to cook and being in the kitchen creating awesome recipes is what I love to do. Okay, I admit it, I’m pretty lame now at thirty-seven! 😉

Okay, so how did my cashew cream turn out? Well, here’s a close-up…

cashewcream2

Cashew Cream Recipe

INGREDIENTS

  • 1 cup raw cashews

PREPARATION

  1. Put cashews in a bowl and cover with cold water. Soak for 4 hours.
  2. Drain cashews. Place in a high-powered blender or food processor.
  3. Cover with cold water and blend until smooth. Use less water for a thicker cashew cream. I’ve also used non-dairy milk instead of water for an extra creamy sauce.

NOTES

You can double this recipe if you want, but I’ve found that this makes plenty. I only use it sparingly or for special recipes that call for cream because the fat content.

Super creamy, super delicious, super awesome! The way cashew cream should be. =)

Don’t feel bad if you don’t have a Vita-Mix, I was very successful for the past couple years making a very creamy cashew cream, but this one is definitely the best when made with the right tool. It’s worth the investment.

I love my new Vita-Mix! It’s gotten me fired-up in the kitchen again.

Keep an eye on my blog for a delicious recipe for cashew creamed spinach this week. =)

Enjoy your day!

xoxo,

Jen

Filed Under: Uncategorized Tagged With: cashew cream, vegan

Baked Eggplant with Fresh Basil and Tomato Sauce

August 21, 2012 By Jennifer

DSC_0186

What do you do when you get some beautiful eggplant from your first CSA pickup at your local organic farm? You do what I did – I made my favorite baked eggplant no-parm recipe! Did you know that eggplant parmesan has been my favorite food to eat pretty much my whole entire life? During each of my two pregnancies, it was my ultimate craving. I would dream about it at night and want it constantly! It’s still one of my favorite foods to eat and here is a healthier version I’ve created for you. It’s baked, not fried and I didn’t even add vegan cheese to it.  I would have made a home-made cashew cheese for this, but I was out of cashews, so I just left it out. Guess what? The no-cheese factor was not even missed. I just baked the eggplant with store-bought low-sodium organic tomato sauce because I was out of home-made and didn’t have time to make any. Hey, and that makes it a lot easier for you too because we are all pressed for time in the kitchen with our busy lifestyles! For the kids and the hubby, I served it with some quinoa pasta and a side salad. I enjoyed mine over a bed of spring mix with fresh basil and a drizzle of balsamic vinegar. Okay and I had a bite of the pasta, couldn’t resist. 😉 This recipe is fantastic either way folks! I hope you enjoy this recipe, we do.

Here’s a peek at all the wonderful produce, herbs and flowers we got from our CSA pickup last week.

csapicture

My son can pretty much devour all that edamame himself, he loves it so much. I’m still trying to figure out what do with the okra, got any suggestions? I would love to pickle it, but I’ve never pickled anything before! Our next pickup is tomorrow and I can’t wait to see what we get and obviously my next blog post will be based around this. You can’t beat fresh, local and organic – I’m in heaven!

5.0 from 1 reviews

Baked Eggplant No-Parm
 

Print

Prep time
20 mins

Cook time
1 hour 30 mins

Total time
1 hour 50 mins


Author: Virtually Vegan Mama
Recipe type: Entree
Serves: 6

Ingredients
  • 2 medium eggplants, sliced into ½-inch rounds
  • 4 flax eggs
  • 1 cup whole-wheat italian style breadcrumbs (I use the whole foods brand)
  • 4 cups low-sodium store-bought tomato sauce
  • Freshly ground black pepper.
  • Fresh basil

Instructions
  1. Preheat oven to 375 degrees F. Line 2 baking sheets with parchment paper or non-stick baking mat. In a bowl combine 4 tbsp flax seed meal with 12 tbsp warm water and stir. Set aside to thicken.
  2. Fill a large sauté pan halfway with water and bring to a boil. Add eggplant slices and blanch for 4 minutes, turning once. Drain on a paper towel and allow to cool slightly.
  3. Dip eggplant slices in flax egg mixture, then dredge in breadcrumbs, season with some fresh black pepper. Place eggplant on baking sheets and bake until golden brown on bottom, 20-25 minutes. Turn slices and continue to bake for an additional 20-25 minutes.
  4. Remove eggplant from oven. Raise oven heat to 400 degrees F. Spread some sauce to cover the bottom of a 9×13 inch baking dish. Place a layer of eggplant slices in the sauce. Spread some sauce on the eggplant slices and repeat with remaining ingredients.
  5. Bake in oven for 15-20 minutes. Serve with fresh basil on top.

Notes
Serving Suggestions: Serve with some quinoa pasta and a side salad. For a lighter meal, serve over some mixed baby green with some balsamic vinegar as a dressing.

2.2.6

What’s your favorite way to cook eggplant?

Have a fabulous day all!

xoxo,

Jen =)

Filed Under: Entrees Tagged With: eggplant parmesan, entree, vegan

Quinoa Cuisine Cookbook Giveaway and Lentil-Quinoa Cheeseburgers!

July 3, 2012 By Jennifer

quinoaburgers


When I got asked to review a copy of Quinoa Cuisine: 150 Creative Recipes for Super-Nutritious, Amazingly Delicious Dishes by Jessica Harlan & Kelly Sparwasser, I couldn’t resist! I am crazy about this superfood. Quinoa is a complete protein that provides all nine essential amino acids, it contains calcium, iron, fiber, potassium, B vitamines, and vitamin E. It has lysine, which is essential in helping the body grow and repair tissues. It’s been shown to help ease migraine headaches, prevents clogging of the arteries and is low in saturated fat and cholesterol. Quinoa has a wonderful nutty flavor and you can easily replace more common grains with it to add substance and health benefits without sacrificing taste. From breakfast to desert and all the potlucks and picnics in between, the 150 recipes in Quinoa Cuisine includes:

  • Quinoa Biscuits and Gravy
  • Black Bean, Corn, and Quinoa Salad with Lime Dressing
  • Two-Bean Quinoa Chili
  • Balsamic Baked Tofu with Asparagus-Caper Quinoa
  • Poached Pears with Spice Quinoa


This cookbook is not vegan, but it does offer a handful of vegan-friendly recipes and has a vegetarian section. However, if you are good at veganizing recipes, almost every recipe can be simply modified. To give you an example of this, I took these fabulous Lentil-Quinoa Cheeseburgers, which are perfect to make for your Fourth of July Celebrations. I posted the original recipe with my notes on how to modify the recipe. This book has so many mouth-watering recipes, I can’t wait to veganize the rest!


quinoaquisinebook

Printer-friendly version

Lentil-Quinoa Cheeseburgers (Jessica Harlan & Kelly Sparwasser)

These “burgers” have a tender interior but a nice crust on the outside. They’re a great veggie option when you’re sick of store-bought frozen meatless patties. The smoked paprika adds a nice flavor, so it’s worth seeking out at a supermarket or specialty food store that has a well-stocked spice aisle. Extra cooked burgers without cheese freeze well. You can reheat them in the oven or microwave, on the grill, or on the stovetop, just as you’d prepare commercial frozen burgers.

Makes 8 Burgers

1 cup white quinoa, rinsed

5 cups water, divided

2 teaspoons extra-virgin olive oil

½ small yellow onion, minced

1 medium carrot, diced

1 rib celery, diced

1 cup brown lentils

1 medium red bell pepper, diced

1 tablespoon soy sauce

1 teaspoon smoked paprika

½ teaspoon garlic powder

½ teaspoon kosher salt

black pepper

1 large egg, lightly beaten

½ cup quinoa flakes

canola oil, as needed

6 slices American or cheddar cheese

6 hamburger buns

lettuce leaves, sliced tomatoes,

ketchup, mustard, or other condiments

1. In a medium saucepan over high heat, bring the quinoa and 2 cups of the water to a boil. Reduce the heat to low, cover, and cook until the water has been absorbed and the quinoa is tender, 10 to 12 minutes. Turn off the heat and let the quinoa sit for 5 minutes. Fluff with a fork and allow to cool.

2. In a large saucepan, heat the olive oil over medium heat. Add the onion, carrot, and celery, and sauté until tender, about 5 minutes. Add the lentils and the remaining 3 cups water, and simmer until the lentils are tender, about 20 minutes. Strain.

3. In a blender, purée the lentil mixture with the bell pepper until they form a slightly chunky paste. Add the soy sauce, paprika, garlic powder, a generous pinch of salt, and a pinch of black pepper; pulse to combine. Transfer the purée to a bowl and stir in the egg, then stir in the cooked quinoa and quinoa flakes. The mixture should be about as thick as mashed potatoes and able to

loosely hold its shape.

4. Using about ½ cup of the mixture for each burger, form into patties. Place on a plate or baking sheet and refrigerate for at least 30 minutes, or as long as several hours, to allow the burgers to firm up.

5. Heat about 2 tablespoons of canola oil in a large nonstick skillet, griddle, or grill pan over medium-high heat. When the oil is hot, place the burgers in the pan, working in batches if necessary to avoid overcrowding. Cook until the underside is browned and crisp, about 8 minutes, then flip and cook until the second side is browned and crisp, 6 to 8 minutes longer. Top with cheese and either cover the pan or put the burgers under a broiler for 1 minute to melt the cheese. Serve on buns with your choice of condiments.

How to Veganize this recipe:

1) Replace the egg with 1 tbsp flax meal or chia seed mixed with 3 tbsp warm water. Allow to sit for several minutes until the mixture firms up like an egg.

2) Replace cheese with Vegan Cheese of choice. or eliminate this step altogether.

3) If you want to eliminate the oil, use vegetable stock or water and sauté the vegetables with that. Add veggies to heated saucepan with 1-2 tbsp of veggie stock or water and sauté, adding more veggie stock or water ass needed to prevent burning. This works just as well as using oil and will save you all that extra fat!

4) Bake the burgers instead of frying them. Preheat oven to 375 degrees F. Place burgers on non-stick baking mat or parchment-lined baking tray. Use a little cooking spray on the mat or parchment to prevent sticking. Bake burgers for 20-30 minutes, turning once halfway through baking.

Now for the Giveaway…

*This Giveaway is now closed. Thanks to everyone who participated. =)

To enter the contest, leave a comment telling me what’s your favorite quinoa recipe. Don’t forget to leave your contact information so I can let you know if you win. =)

BONUS ENTRIES

You MUST leave each entry as a separate comment or only one comment will count.

  • Like Quinoa Cuisine on Facebook and leave a comment on their wall.
  • Subscribe to Virtually Vegan Mama
  • Like Virtually Vegan Mama on Facebook and leave a comment on my wall.
  • Follow Virtually Vegan Mama (@virtveganmama) on Twitter
  • Tweet about this giveaway and tell me that you tweeted in the comments section; “I just entered to win Quinoa Cuisine @virtveganmama”
  • Share this giveaway on your Facebook Page and tell me that you did so in the comments section
  • Stumble this giveaway
  • Pin it

All entries must be completed no later than Tuesday, July 10th 2012,  at 11:59 p.m. EST.

Winner will be announced on Wednesday, July 11th 2012, on my blog, and the winner will also be notified via the email address they provided in the comments section.

Giveaway open to U.S. and Canada residents only. =)

Good luck and Happy Fourth of July!

xoxo,

Jen

Filed Under: Entrees Tagged With: giveaway, quinoa, vegan, veggie burgers

Spinach Stuffed Mushrooms

June 4, 2012 By Jennifer

untitled (26)

I am not thrilled with the look of these mushrooms on camera, but I am thrilled with the taste. Can you even make stuffed mushrooms look camera-worthy? I love the flavor the little tomatoes add to the dish, but not loving that they got all wrinkly. 😉 But, if you like stuffed mushrooms as much as I do, these are a nice, easy appetizer to make. I added toasted pine nuts to this recipe, but thought they were a bit overpowering, so if you feel like adding them go for it or skip it all together. Skipping them will definitely cut the fat content if that’s what you’re looking for. =) I added a little balsamic vinegar that added a hint of sweetness, but also made the spinach turn into more brown than green. Oh well, still yummy!

These little treats are inspired by my fabulous neighbor Helen and her mother-in-law. They made a similar stuffed mushrooms appetizer for a get-together we attended, but theirs included feta. Thanks for the inspiration and if you are reading this there are leftovers in the fridge, I know you love to sample my treats. =)

Okay, so here’s the recipe and if you try these out, please let me know what you think. I will however be making these again and again until they are perfect and shine on camera!

Easy Appetizer: Spinach Stuffed Mushrooms
 

Print

Prep time
10 mins

Cook time
25 mins

Total time
35 mins


Author: Virtually Vegan Mama
Recipe type: Appetizer
Serves: 6-8

Ingredients
  • 16 large button mushrooms, stems removed (reserve stems) and caps left intake
  • 1 garlic clove, minced
  • ½ cup mushroom stems, finely chopped
  • ½ cup vidalia onion, diced
  • ½ cup roasted red pepper, diced
  • 2 tbsp. toasted pine nuts (optional)
  • 1 (10 oz) package frozen spinach, thawed and squeezed of excess water
  • 1½ tsp. balsamic vinegar
  • Cherry tomatoes, halfed
  • Black pepper to taste
  • no salt added vegetable stock for sautéing

Instructions
  1. Preheat oven to 375 degrees F.
  2. Heat a medium non-stick skillet over medium-high heat.
  3. Add mushroom stems, onions, garlic and 1 tbsp of veggie stock. Cook 8 to 10 minutes, stirring occasionally, until sofetened, adding small amounts of veggie stock to prevent sticking.
  4. Meanwhile, heat a small non-stick skillet over medium-low heat. Add pine nuts and toast, shaking often to prevent burning. Remove pine nuts when lightly browned from pan and set aside.
  5. Stir in spinach, roasted red peppers, toasted pine nuts, balsamic vinegar and black pepper to taste. Heat for an additional 2 minutes.
  6. Arrange mushroom caps on a non-stick baking pan or a baking dish. Divide filling evenly between mushrooms, rounding top with a spoon. Add half of a cherry tomato to each mushroom cap.
  7. Bake for 20-25 minutes, or until softened and juicy.
  8. Serve immediately. Enjoy!

2.2.6

What’s your favorite filling for stufffed mushrooms?

Enjoy!

Jennifer

Filed Under: Appetizers Tagged With: appetizer, mushrooms, spinach, stuffed mushrooms, vegan

The Sexy Vegan Cookbook Giveaway!

May 28, 2012 By Jennifer

and Brian’s recipe for Beany Tahini Burgers with Dreamy Tahini Dressing.

beanytahini

In The Sexy Vegan Cookbook: Extraordinary Food from an Ordinary Dude  (New World Library, March 15, 2012), “regular dude” and YouTube cooking sensation Brian Patton shares 100 vegan recipes that are failure-proof, fun, and flavor-filled.

The Sexy Vegan Cookbook covers the basics of cooking, from slicing vegetables to finding the right type of tofu to recreating favorites without meat or dairy. With more than 100 recipes, Brian covers everything from cocktails (according to the Sexy Vegan, the most important meal of the day) to amazing breakfast sandwiches to desserts such as Sailor Peanut Rum Ice Cream. There are appetizers and nachos, pizza and tuna-like sandwiches as well as plenty of salads, pasta, and main dish choices.

sexyvegancookbook


Watch the trailer, it gave me quite a laugh. I’m definitely loving Brian’s attitude and sense of humor…something we all need a little more of. =)

You can visit Brian online and watch his fun cooking videos  here: http://www.thesexyvegan.com.

Since it’s Memorial Day Weekend and we all know that includes burgers, burgers and more burgers. What better way to celebrate the holiday and Brian’s awesome cookbook than by making one of his fabulous burger recipes.

5.0 from 2 reviews

The Beany Tahini Burger and Dreamy Tahini Dressing
 

Print

Author: Brian L. Patton

Ingredients
  • Makes 4 burgers
  • Ingredients:
  • One 15-ounce can chickpeas, drained and rinsed
  • ½ cup cooked couscous
  • 1 tablespoon tahini
  • 1 clove garlic, grated
  • 1 tablespoon chopped fresh oregano
  • 2 tablespoons chopped kalamata olives
  • 1½ teaspoons salt
  • ¼ teaspoon pepper
  • ½ roasted red bell pepper, diced
  • 2 tablespoons extra-virgin olive oil
  • 4 buns of your choosing, halved
  • 2 tablespoons Dreamy Tahini Dressing
  • ½ medium cucumber, thinly sliced
  • 2 cups shredded romaine lettuce
  • 1 beefsteak tomato, thinly sliced
  • ½ red onion, thinly sliced
  • For Dreamy Tahini Dressing:
  • Makes 1½ cups
  • Ingredients:
  • ½ cup tahini
  • 2 tablespoons fresh lemon juice
  • ½ cup water
  • ½ clove garlic
  • 2 teaspoons chopped fresh italian parsley
  • 2 teaspoons chopped fresh mint
  • 1 teaspoon extra-virgin olive oil
  • Pinch of smoked paprika
  • Salt and pepper

Instructions
  1. For the burgers:
  2. To make burger patty, in a large bowl, combine chickpeas, couscous, tahini, garlic, orgeano, olives, salt, and pepper. With a fork, potato masher, or your very clean hands, mash all of it together until 90 percent of the chickpeas are mashed. Now that you have this mass, gently fold in the roasted pepper as it would have been destroyed during the initial mixing). Divide the chickpea mixture into four portions and form into ¼-inch-thick patties.
  3. In a large skillet, heat the oil over medium-high heat. Add your burger patties to the pan, and cook them for 3 to 4 minutes per side, or until golden brown. Slather each bun half with dreamy tahini dressing, and assemble the burgers from the bottom up in the following order: 1 bun half, cucumber, chickpea patty, lettuce, tomato, onion, and the other bun half.
  4. For the Dreamy Tahini Dressing:
  5. In a food processor or blender, combine the tahini, lemon juice, water, garlic, parsley, mint, oil, and paprika, and puree until smooth. Season to taste with salt and pepper.

3.2.2925

I made these into 8 sliders instead of 4 burgers. Alternately, you can bake these at 400 degrees F for 12 minutes, flipping halfway through cooking. I omitted the oil in the Dreamy Tahini Dressing and did not add any salt to either recipe. I also ate mine without the bun and a big green salad. This recipe is fantastic and foolproof. It’s easy, delicious and nutrient-rich. Please go check out Brian’s website http://www.thesexyvegan.com. He definitely has a lot to offer the plant-based world with his creativity and humor, thanks Brian for sharing your cookbook with me. =)

beany2

This giveaway is now closed =)

And now for the giveaway!

To enter the contest, leave a comment telling me what’s your favorite burger recipe. Don’t forget to leave your contact information so I can let you know if you win. =)

BONUS ENTRIES

You MUST leave each entry as a separate comment or only one comment will count.

  • Follow Brian @TheSexyVegan on Twitter
  • Like The Sexy Vegan on Facebook
  • Subscribe to Virtually Vegan Mama
  • Like Virtually Vegan Mama on Facebook and leave a comment on my wall.
  • Follow Virtually Vegan Mama (@virtveganmama) on Twitter
  • Tweet about this giveaway and tell me that you tweeted in the comments section; “I just entered to win The Sexy Vegan Cookbook by Brian L. Patton @virtveganmama”
  • Share this giveaway on your Facebook Page and tell me that you did so in the comments section
  • Stumble this giveaway
  • Pin it

All entries must be completed no later than Monday, June 4th 2012,  at 11:59 p.m. EST.

Winner will be announced on Tuesday, June 5th 2012, on my blog, and the winner will also be notified via the email address they provided in the comments section.

Good Luck and I know you will enjoy this recipe and Brian’s cookbook!!!

Happy Memorial Day!

xoxo,

Jen


Filed Under: Entrees Tagged With: burgers, entree, vegan, veggie burger

Easy and Delicious Roasted Rosemary String Beans

April 23, 2012 By Jennifer

DSC_0396

Something I like to have in the house at all times, are a few healthy and delicious sides that I can serve up to the family throughout the week. This is my new favorite side. I throw it over a green salad with a splash of balsamic and I’m good to go. It’s easy to make and comes out prefect every time. I love the addition of nutritional yeast in there for the flavor and the nutritional benefits. I gave the option in the recipe for folks that use oil in their cooking – but of course you don’t need to add it – the veggie stock does the trick just fine. Diced shallots and/or chopped walnuts are a nice addition to this side as well.

You cannot go wrong with roasting veggies in my opinion and a little maple syrup makes this side slighty sweet and oh so yummy. This makes everyone in my household very happy.

Easy and Delicious Roasted Rosemary String Beans
 

Print

Prep time
5 mins

Cook time
15 mins

Total time
20 mins


Author: Virtually Vegan Mama
Serves: 4

Ingredients
  • 1 lb string beans, trimmed and washed
  • 2 tbsp no salt added vegetable stock
  • 1 tbsp rosemary
  • 1 tsp date syrup or pure maple syrup
  • 1½ tsp nutritional yeast
  • 1 small garlic clove, minced
  • 1 tsp healthy oil like avocado (optional)
  • pinch onion powder
  • fresh black pepper, to taste

Instructions
  1. Preheat oven to 400 degrees F.
  2. Toss the beans with remaining ingredients in a medium-sized bowl.
  3. Place string beans on non-stick baking pan.
  4. Roast in oven for 15-20 minutes or until beans are tender and slightly browned in spots, turning once.
  5. Serve.

Notes
The addition of some dijon mustard is also great in this recipe.

3.2.2124


Enjoy!

What’s your favorite way to roast veggies?

Filed Under: Sides Tagged With: side, vegan

Vegan Holiday Kitchen Giveaway and Vegan Matzo Ball Soup

April 9, 2012 By Jennifer

DSC_0386

I know, it’s been the month of Giveaways, but I had the pleasure of receiving several complimentary copies of vegan cookbooks and couldn’t resist checking these amazing cookbooks out and sharing some wonderful recipes with you.

Up next is the fabulous Vegan Holiday Kitchen from Nava Atlas. Trust, me you are going to want to enter to win this fabulous cookbook. I made her Vegan Matzo Ball soup and I was overjoyed with the result. This is one recipe that was on my list to veganize, but I was a little wary of doing this. I mean I have in my memory traditional Mom-made perfect Matzo Ball Soup and wasn’t sure if I could ever recreate it vegan. Boy, was I wrong! Seriously, the only difference is removing the chicken broth, all the flavors are there from the vegetables, seasonings and fresh dill. Nava took care of the matzo balls falling apart with out the use of eggs by using quinoa flakes as a binder and it worked perfectly. This is a no-fail recipe and unbelievably delicious, my family absolutely loved it. Nava, thanks for this wonderful recipe, you nailed this one. =)

veganholidaycover

This gorgeous and exciting cookbook by author Nava Atlas brilliantly fills the biggest gap in the vegan repertoire with more than 200 delectable, completely doable recipes for every festive occasion.  Atlas, one of the most respected names in vegetarian and vegan cooking, addresses everything from Thanksgiving, Hanukkah, and Christmas –to celebratory brunches, lunches, dinners, potlucks, and buffets. Such mouth-watering dishes as Coconut Butternut Squash Soup, Green Chili Corn Bread, Hearty Vegetable Pot Pie, delicate Ravioli with Sweet Potatoes and Sage, and Cashew Chocolate Mousse Pie will convince even the most skeptical eater that vegan cooking is well worth celebrating.

Nava Atlas is both the author and illustrator of many well-known vegetarian and vegan cookbooks, including Vegan Express, Vegan Soups, The Vegetarian Family Cookbook, and The Vegetarian 5-ingredient Gourmet.  Her first book was Vegetariana, now considered a classic in its field. Nava is also a visual artist, specializing in limited-edition artists’ books and text-driven objects and installations. Her work has been shown nationally in museums, galleries, and alternative art spaces and is part of many museum and university collections.

I almost didn’t want to giveaway away this cookbook it’s so awesome.

PRINTABLE VERSION

Simple Vegetable Soup with Vegan Matzo Balls – Gluten-free (by omitting matzo balls), soy-free, nut-free

Vegetable Soup

8 Servings

This soup served at traditional Passover seders is very much akin to this one, except that’s made with chicken broth. In truth, the Passover soup course functions primarily as a venue for the matzo balls

Ingredients:

2 tablespoons olive oil or other healthy vegetable oil

1 large onion, finely chopped

3 celery stalks, diced

1 32-ounce carton vegetable broth

6 medium potatoes, peeled and finely diced

6 to 8 medium carrots, sliced

Handful of celery leaves

1 tablespoon all-purpose seasoning blend, or use a Kosher for Passover brand

1/4 cup chopped fresh dill, or to taste

Salt and freshly ground black pepper to taste

Vegan Matzo Balls (recipe follows)

Directions:

  1. Heat olive oil in a large soup pot. Add the onion and celery and sauté over medium heat until golden
  2. Add the broth, potato, carrots, celery leaves, seasoning blend, and 2 cups water. Bring to a rapid simmer, then cover and simmer gently for 15 to 20 minutes, or until the vegetables are tender.
  3. Stir in the dill, then season with salt and pepper. If time allows, let the soup stand for several hours off the heat to develop flavor. It can also be made a day in advance.
  4. Just before serving, bring to a simmer. Adjust consistency with more water if needed be, and taste to adjust seasonings. Add warmed matzo balls to individual servings of soup.

Vegan Matzo Balls – soy-free, nut-free, can be made Gluten-free using gluten-free option

Makes about 24

Ingredients:

1 cup quinoa flakes

2 cups boiling water

1 cup matzo meal (see gluten-free variation, below)

1/4 cup light vegetable oil (such as safflower)

1/4 teaspoon salt

A few grindings of black pepper

Pinch of onion and garlic powder, optional

Directions:

  1. In a large mixing bowl, cover quinoa flakes with the water. Let stand for 2 or 3 minutes.
  2. Stir in the matzo meal along with the oil, and mix until well blended. Cover the bowl and refrigerate for at least 15 minutes.
  3. Just before baking, preheat the oven to 275 degrees F.
  4. Roll the matzo meal mixture into approximately 1 -inch balls; don’t pack them too firmly. Arrange on a parchment-lined baking sheet.
  5. Bake for 20-25 minutes, carefully turning matzo balls after 10 minutes, until firm to the touch; don’t let them brown.
  6. If making ahead of time, let the matzo balls cool completely. then cover until needed. Warm them briefly in a medium oven and distribute them among the soup bowls, allowing 3 or 4 matzo balls per serving.

Variation: to make these gluten-free, substitute 1 1/4 cups quinoa flakes for the matzo meal. Don’t add them to the original quantity of quinoa flakes; this is a  separate measure to use dry. A bit more is needed than the quantity of matzo meal for the purpose, as the quinoa flakes are less dense.

Recipe reprinted with permission from Vegan Holiday Kitchen © 2011 by Nava Atlas, Sterling Publishing Co., Inc.

Learn more about Nava at VegKitchen.com, and navaatlasart.com.

And now for the GIVEAWAY!!

One lucky reader will win Vegan Holiday Kitchen by Nava Atlas!

To enter the contest, leave a comment telling me what’s your favorite recipe(s) to serve during the Holidays. Don’t forget to leave your contact information so I can let you know if you win. =)

BONUS ENTRIES

You MUST leave each entry as a separate comment or only one comment will count.

  • Subscribe to Virtually Vegan Mama
  • Like Virtually Vegan Mama on Facebook and leave a comment on my wall.
  • Follow Virtually Vegan Mama (@virtveganmama) on Twitter
  • Tweet about this giveaway and tell me that you tweeted in the comments section; “I just entered to win Vegan Holiday Kitchen by Nava Atlas @virtveganmama”
  • Share this giveaway on your Facebook Page and tell me that you did so in the comments section
  • Stumble this giveaway
  • Pin it

***This Giveaway is now closed…thanks to all for entering!***

All entries must be completed no later than Monday, April 16th 2012,  at 11:59 p.m. EST.

Winner will be announced on Tuesday, April 17th 2012, on my blog, and the winner will also be notified via the email address they provided in the comments section.

Good Luck!!!

xoxo,

Jen

Filed Under: Appetizers Tagged With: holiday, passover, soup, vegan

750 Best Appetizers Cookbook Giveaway

March 27, 2012 By Jennifer

Vegetarian Vietnamese Fresh Rolls

VegetarianVietnameseFreshRoll

Photo credit: Colin Erricson/www.robertrose.ca

I had the pleasure of receiving this amazing cookbook for review. I couldn’t resist getting my hands on a book with 750 Appetizers to chose from. Yeah, it’s not all vegan, but if your household is like mine – my husband still eats meat on occasion – there are multiple recipes to suit every dietary preference. This cookbook does include tons of vegetarian and vegan friendly recipes like those beautiful spring rolls above. How can you go wrong with all those fresh ingredients and aren’t they beautiful to look at? I made these rolls and they were gone in a matter of minutes they were so yummy. I can’t wait to serve this recipe up to guests.

4.8 from 4 reviews

Vegetarian Vietnamese Fresh Rolls
 

Print

This is almost a two‑for-one recipe —the fresh rolls are wonderful all on their own but the leftover marinade creates the perfect dipping sauce.
Author: Excerpted from 750 Best Appetizers by Judith Finlayson and Jordan Wagman © 2011 www.robertrose.ca Reprinted with permission. All rights reserved.
Recipe type: Appetizer
Serves: 8

Ingredients
  • Dressing
  • 2 tbsp soy sauce 30 mL
  • 2 tbsp sweet Asian chili sauce 30 mL
  • 1⁄2 tsp toasted sesame oil 2 mL
  • 1⁄2 tsp rice vinegar (see Tips) 2 mL
  • 1⁄2 tsp minced garlic 2 mL
  • 1⁄2 tsp finely chopped pickled ginger 2 mL
  • 1⁄4 tsp minced gingerroot 1 mL
  • 2 cups shredded baby bok choy 500 mL
  • 3⁄4 cup julienned blanched asparagus 175 mL
  • (see Tips, left)
  • 3⁄4 cup julienned peeled carrots 175 mL
  • 1⁄2 cup julienned English cucumber 125 mL
  • 1⁄4 cup julienned mango 60 mL
  • 1⁄4 cup finely chopped toasted peanuts 60 mL
  • 8 10-inch (25 cm) rice paper wrappers 8
  • 3 cups hot water 750 mL
  • Dipping sauce, optional (see Tips)

Instructions
  1. Dressing: In a bowl, combine soy sauce, chili sauce, oil, vinegar, garlic, pickled ginger and minced ginger.
  2. In another bowl, combine bok choy, asparagus, carrots, cucumber, mango and peanuts. Add 2 tbsp (30 mL) dressing and toss well. Divide into 8 equal portions.
  3. Working with one rice paper at a time, submerse in hot water until pliable, about 30 seconds. Place on a work surface. Spread one-portion of the vegetable mixture in a strip across the lettuce leaf about one-third away from the edge closest to you, leaving about 1 inch (2.5 cm) on either side. Fold the edge closest to you over the filling and pull gently toward you to encase the filling. Fold the sides toward the middle, then continue to roll up tightly. Place rolls under a damp cloth to stay moist because the wrappers tend to dry out quickly. Serve rolls immediately with dipping sauce, if using, or refrigerate for up to 1 hour. Serve whole or for a small hors d’oeuvre, cut in half on the diagonal and place on a serving platter.

Notes
Tips To julienne asparagus, cut into thin slices lengthwise and slice those slices into thin strips. For a wonderful dipping sauce, in a small ramekin, combine the remaining dressing with 1⁄4 cup (60 mL) soy sauce and 1 tbsp (15 mL) coarsely chopped Agave and Ginger-Scented Peanuts (page 455).

2.2.6

There are 24 full page colored photos in the center of the book.  With 576 pages, it has every appetizer that you can imagine.  If you’re into entertaining, this is definitely a cookbook for you!

appetizers_coverThis Giveaway is now Closed, thanks to all who participated!

And now for the GIVEAWAY!!

One lucky reader will win 750 Best Appetizers Cookbook.

To enter the contest, leave a comment telling me what your favorite appetizer is. Don’t forget to leave your contact information so I can let you know if you win. =)

BONUS ENTRIES

You MUST leave each entry as a separate comment or only one comment will count.

  • Subscribe to Virtually Vegan Mama
  • Like Virtually Vegan Mama on Facebook and leave a comment on my wall.
  • Follow Virtually Vegan Mama (@virtveganmama) on Twitter
  • Tweet about this giveaway and tell me that you tweeted in the comments section; “I just entered to win 750 Best Appetizers Cookbook from @virtveganmama”
  • Share this giveaway on your Facebook Page and tell me that you did so in the comments section
  • Stumble this giveaway
  • Pin it

All entries must be completed no later than Tuesday, April 3, 2012,  at 11:59 p.m. EST.

Winner will be announced on Tuesday, April 3, 2012, on my blog, and the winner will also be notified via the email address they provided in the comments section.

Good Luck!!!

xoxo,

Jen

Filed Under: Appetizers, Entrees Tagged With: appetizer, entree, spring rolls, vegan, vegetarian

The Winner of Chef AJ’s Unprocessed Cookbook Giveaway and Smoky Roasted Red Pepper Hummus

February 29, 2012 By Jennifer

DSC_0002-001Before I announce the winner of Chef AJ’s Unprocessed Cookbook, let me tempt you with my new favorite hummus recipe using my new addiction – smoked paprika. Paprika is not only a colorful garnish, it’s loaded with vitamin C and has anti-inflammatory properties. I’m always adding paprika to my recipes to add color, depth and flavor. Now that I’ve delved into the wonderful world of smoked paprika, I am constantly thinking of new ways I am going to use it. I gave it a shot in one of my basic hummus recipes and was not disappointed with the results. This hummus has a wonderful combination of flavors that you can enjoy with cut-up veggies, spread on pita, toast or with some yummy falafel.

And we all know how important beans are to vegan and vegetarian diets and hummus is my favorite way to get in my daily allowance. Packed with iron, vitamin C, protein and dietary fiber and I seriously never get bored eating it. You can get creative and come up with different versions of it, just like this one.

Smoky Roasted Red Pepper Hummus
 

Print

Author: Virtually Vegan Mama
Recipe type: Appetizer, Side
Serves: 1½ cups

Ingredients
  • 1 (15) oz. can no-salt added or low-sodium garbanzo beans (chickpeas), drained
  • ½ cup roasted red peppers, chopped
  • 5 kalamata olives, pitted
  • 1-2 tbsp sesame tahini
  • ¼ tsp smoked paprika
  • ¼ tsp ground cumin
  • ¼ tsp ground coriander
  • 4 tbsp fresh lemon juice
  • 2 tbsp raw apple cider vinegar
  • Handful of fresh parsley

Instructions
  1. Combine all ingredients in a blender or food processor. Process until smooth and creamy, adding some vegetable stock if too thick and you reach your desired consistency.

2.2.5

What’s your favorite way to enjoy hummus?

And now…the winner of the Chef AJ Cookbook Giveaway is…

giveawaycheajresults

Congratulations to Laura White for winning this fabulous cookbook! I have emailed you to confirm.

I had so much fun doing this and have two more giveaways coming up, so stayed tuned and thanks to everyone for participating! =)

xoxo,

Jen


Filed Under: Appetizers Tagged With: beans, hummus, vegan, vegetarian

  • « Previous Page
  • 1
  • 2
  • 3
  • 4
  • 5
  • Next Page »

Copyright Pure Thyme, LLC© 2026


Loading Comments...