Pure Thyme

For a Balanced Life

  • Home
  • Pure Me
  • Pure Recipes
  • Pure Press
  • Contact Page

Summer Fest: Fresh Cherry and Almond Scones – Vegan and Sugar Free

August 2, 2011 By Jennifer

scones

This week for FNdish season long Summer Fest 2011 garden party, we are featuring cherries. Cherries not only boast a distinctive flavor – ranging from sweet to tart – but this high-antioxidant fruit will help reduce inflammation, pain and may help you get a good night’s sleep. You can check out a great article on the health benefits of cherries.

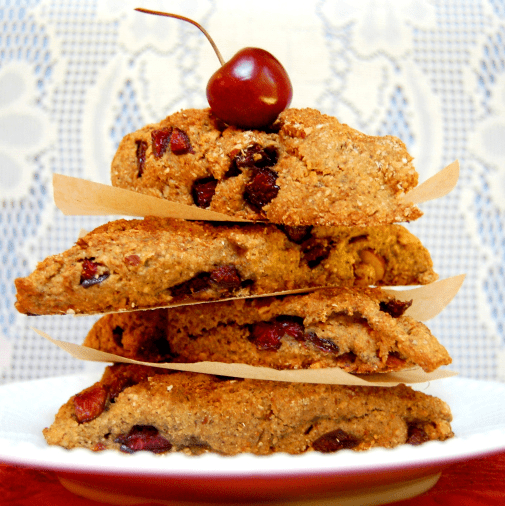
Scones make a wonderful summer treat to enjoy outside while hosting an afternoon tea party. Fresh instead of dried cherries make these scones pop with flavor. Prepare to savor the crunchy, slightly sweet outside that is complimented with a spring flavor that is light and soft on the inside. Break off a bite-sized piece of this scone and spread some fresh fruit preserves or some vegan butter on it. Or enjoy these scones plain – like I did – they are so delcious they don’t need anything at all.

These scones are nutrient-rich and good-for you. They are made with whole-wheat pastry flour and get their sweetness from the fresh cherries and date sugar. I also used a small amount of Earth Balance Organic Cocount Spread and was blown away by the results. The folks over at Earth Balance gave me a coupon to try it out. The coconut spread is rich, creamy and helped make these scones super moist and fluffly on the inside. I highly recommed trying it out if you get a chance. It’s also lactose-free, soy free, gluten-free, organic, vegan, made without genetically modified ingredients and packed with medium-chain fatty acids. Perfect! You can make these scones gluten-free by just substituing the whole-wheal pastry flour with your gluten-free flour of choice.

Enjoy!

What’s your favorite way to eat and enjoy cherries?

Fresh Cherry and Almond Scones

Yield: Makes 8 scones

Ingredients:

2 cups whole-wheat pastry flour

1/4 cup date sugar, I use Aunt Patty’s

2 tsp baking powder

1 tsp baking soda

1 tsp ground cinnamon

4 tbsp Earth Balance Coconut Spread

1/4 cup raw almonds, chopped

1/2 cup fresh cherries, chopped

3/4 cup plain dairy-free yogurt

1 tsp almond extract

1 tsp pure vanilla extract

2 tbsp flaxseed meal, mixed with 6 tbsp warm water (to replace two eggs)

1 tbsp date sugar for topping

1/2 tsp cinnamon for topping

Directions:

Preheat oven to 425 degress F. Line a baking tray with a non-stick baking mat or parchment paper.

Stir together flaxseed meal and warm water in a small bowl. Allow to stand for five minutes or until thickened and gooey like an egg.

In a large bowl, sift together flour, baking powder, baking soda and cinnamon.

In a small bowl, stir together yogurt, almond extract and almond extract.

Add dry ingredient to food processor. Add coconut spread, flaxseed meal mixture and yogurt and pulse until just combined.

Transfer back to large mixing bowl and gently fold in chopped cherries and almonds.

Transfer dough to lightly floured work surface and form into a 3/4 inch thick rectangle. Using a sharp knife, cut into 8 egual wedges.

Place scones on baking sheet. Mix date sugar and cinnamon together and sprinkle over tops of scones.

Bake for 12-15 minutes or until lightly brown and toothpick inserted in the center comes out clean. These scones are best eaten the day they are made.

summerfest


Summer Fest is a season long event where Food Network Editors team up with blogs to share tips and recipes about seasonal produce. During Summer Fest, we celebrate the season’s bounty of fresh fruit and veggies. For more inspired dishes cooking with cucumbers, be sure to check out all these great sites that are participating in Summer Fest this week.

What’s Gaby Cooking: Cherry Chocolate Truffle Ice Cream

Big Girls Small Kitchen: Cherry Cornmeal Cake

Cooking With Elise: Roasted Cherries with Lavender and Almond Panna Cotta

Daydreamer Desserts: Cherry Crumble Cake

Ingredient Challenge Monday: Black Forest Ice Cream Done Two Ways

Spices and Aroma: Dilkush with Cherries

And Love It Too: Cherry-Pecan Chicken Salad

FN Dish: The Ultimate Cherry Pie

Daily*Dishin: Simple French Cherry Clafouti

Glory Foods: Collard Greens and Cherry Reduction

Chez Us: Gluten-Free Cherry Clafoutis

Food for 7 Stages of Life: South Indian Hot and Sour Soup

Virtually Homemade: Dark Chocolate Cherry Kuchen

In Jennie’s Kitchen: Cherry Conserves

The Sensitive Epicure: Gluten-Free Cherry Almond Clafouti

Cooking Channel: Very Cherry Sangria

Napa Farmhouse 1885: Cherry Balsamic Vinegar

Zaika Zabardast: Balsamic Cherry and Peach Crisp

Mooshu Jenne: Rainier Cherry Panna Cotta

Food2: A Very Cherry Recipe Round-Up

CIA Dropout: Italian Cherry Cake

Sweet Life Bake: Honey-Tequila Pickled Cherries

Cooking With Books: Cherry Cooler

Recipe Girl: Cherry Limeade Pound Cake


Filed Under: Appetizers, Breakfast, Desserts, Holidays Tagged With: almonds, breakfast, cherries, dessert, scones

Summer Fest Fire-Roasted Tomato and Cucumber Gazpacho

July 19, 2011 By Jennifer

gazpacho
I don’t know about you, but we are having a heat wave here in New Jersey right now. I need something refreshingly cold and delicious to feed my family and keep us cool during these hot summer months. The trip to our local farmer’s market this past weekend left me with some cucumbers and of course, beautiful and juicy jersey tomatoes. What better way to use these fresh veggies than to make the perfect summertime gazpacho soup.  

Traditionally, Gazpacho is made with uncooked vegetables, but I couldn’t resist grilling the tomatoes and roasting some peppers for some fire-roasted goodness. Add some other fresh diced vegetables to this like celery or corn. I also added some fresh diced mango because my kids love fruit and that was the perfect addition. 

This is my version of this classic Spanish soup.

Enjoy!

This recipe is adapted from The Barefoot Contessa.

Summer Fest Fire-Roasted Tomato and Cucumber Gazpacho

Yield: 4-6 servings

Ingredients:

4 medium tomatoes, sliced and grilled

4 plum tomatoes, sliced and grilled

1 cup roasted red pepper, diced

1 cup roasted poblano pepper, diced

2 cups cucumber, diced

1 cup red onion, diced

2-3 cloves garlic, minced

2 limes, 1 juiced and 1 sliced

¼ cup white wine vinegar

1 ½ tsp ground coriander

1 ½ tsp ground cumin

¼ cup cilantro, minced

1 jalapeno, seeded and minced (optional)

Directions:

Roast peppers over a gas flame on your stove, turning with tongs until skin is evenly charred. Transfer to plate and allow to cool. Peel the charred skin by hand. Once peeled cut away the stems, seeds and veins.

Brush tomatoes with 1 tsp of olive oil. Place the tomatoes on grill and cook 5-7 minutes on each side, or until slightly charred. Remove from heat and set aside.

Add grilled tomatoes, ½ cup diced cucumber, ½ cup roasted red pepper, ½ cup roasted poblano pepper, garlic, coriander, cumin, cilantro, juice of 1 lime and red wine vinegar to cuisinart or blender. Puree until smooth.

gazpacho2

Transfer to a bowl and mix in remaining ingredients. Season with fresh black pepper and chill in the refrigerator minimum 4 hours to allow the flavors to combine. The colder the better with this soup. To serve garnish with fresh minced cilantro and serve with lime wedges.

I would definitely make this next time with fresh tomato juice instead of canned. I am making it again very soon, so watch for the update. I don’t know why I used canned in the first place when I am surrounded by so many gorgeous tomatoes!

*I have updated this recipe and removed canned tomato juice – it was keeing me up at night and giving me nightmares! 😉

Summer Fest is a season long event where Food Network Editors team up with blogs to share tips and recipes about seasonal produce. During Summer Fest, we celebrate the season’s bounty of fresh fruit and veggies. This week we are sharing recipes using cucumbers. For more inspired dishes cooking with cucumbers, be sure to check out all these great sites that are participating in Summer Fest this week.

Pinch My Salt: Chilled Cucumber, Kefir and Avocado Soup

What’s Gaby Cooking: Cucumber-Basil Gimlet

In Jennie’s Kitchen: Radish-Cucumber Crostini

Big Girl Small Kitchen: Spicy Cucumber Salad with Shallot, Ginger and Mint

Grecian Kitchen: Summer Cucumber Salad

And Love It Too: Cucumber, Mint and Watermelon Salad

Napa Farmhouse 1885: Cucumbers Coolers with Agave Simple Syrup

Cooking With My Kid: Cucumber Limeade

FN Dish: Summer Fest: Cucumber Recipes

CIA Dropout: Relishing Cucumbers

Healthy Eats: Cool Cucumber Soup

Food for 7 Stages of Life: Cucumber Cherry Salsa

Cooking With Elise: Green Tea Cucumber Pops

Glory Foods: Cucumber and Shrimp Boat

Food2: When Life Gives You Cucumbers, Make a Cucumber Cocktail

Cooking Channel: Cucumbers Stuffed with Crab-Mango Salad

Recipe Girl: Bread and Butter Pickles

Taste With the Eyes: Spicy Pickled Cucumbers with Wakame and Garlic Blossoms

Virtually Homemade: Cold Thai Cucumber-Mint Soup

Add a Pinch: Cucumber Tea Sandwiches

The Cultural Dish: Ahi Tuna with Cucumber Sauce and Salad

Daily*Dishin: Cool n’ Zesty Cukes: 7 Minute Summer in a Jar

Daydreamer Desserts: Cubanita Margarita

Purple Cook: Cucumber Gazpacho with Indian Flavored Shrimp Relish

Indian Simmer: Cucumber at its Best with Chaat Masala

Big Apple Nosh: Quick and Easy Homemade Pickles

Sweet Life Bake: Agua de Pepino

The Sensitive Epicure: Tzatziki with Grilled Gluten-Free Pitas and Fresh Cucumbers and Peppers

Zaika Zabardast: Cucumber Gazpacho

A Way to Garden: Cucumber-Growing Q&A and the Best Pickles

Cooking with Books: Summer Fest: Cucumbers

Filed Under: Appetizers, Soups and Stews Tagged With: cucumber, gazpacho, soup, tomato

Toasted Quinoa Vegetable Stacks with Green Goddess Dressing

July 19, 2011 By Jennifer

toastedquinoa
This stacked vegan entrée is not only beautiful to look at, but nutrient-rich and satisfying. It’s the perfect fusion of summer flavors and colors, to be enjoyed outdoors surrounded by friends and family.

Check out my column and latest recipe on One Green Planet.

Enjoy!

Filed Under: Entrees Tagged With: portobello mushrooms, quinoa

Cashew Date Cream Stuffed Strawberries

June 27, 2011 By Jennifer

stuffedstrawberries

I wasn’t even planning on making these for this weeks blog post – you were suppose to get Jerk String Beans with Roasted Red Pepper Sauce – don’t worry you’ll get those soon – and they are going to be worth the wait. I always have an idea of what I want to share with you, but sometimes I get inspired and end up filing away the other recipe for the future. I’m glad I did this time, this recipe will knock your socks off.

It’s almost Fourth of July and what better way to celebrate by serving up these beautiful, tasty  and healthy red, white and blue treats. Trust me, no one will even know they are healthy treats they are so good. These are so easy to make and I bet if you serve this up at your July 4th BBQ people will be begging for the recipe. The cashew date cream isn’t stark white, but still gives the red, white and blue feel I was looking for. I could have made a coconut whipped cream – that would have been more white – but I felt this was the way to go. The cashew date cream is so sinfully good. It compliments the sweetness of the strawberries and tartness of the blueberries. It is the perfect marriage of flavors – I had to fend off my family from eating them so I could just get one good picture! My 3 year old was so happy I was done, she ate every single one off the plate, minus the one my poor husband got. I have plenty of leftover cream, strawberries and blueberries in the fridge to make more today, so he’s happy.

I am going to be making the cashew date cream for other recipes since it is so good. It would make a good icing for cupcakes or banana bread muffins. I’m going to make my Healthy Vegan Banana Bread into muffins to update the recipe for you, and of course a gluten-free version of both – I am working on it. Can I make home-made twinkies and fill it with this? Oh, yes, I’m so on it!

These are also great for a tea party, shower, dinner party – actually you can serve them at any party, or anytime. =) Make the cashew cream sauce ahead of time and store in the refrigerator.

Cashew Date Cream Stuffed Strawberries
 

Print

Author: Jennifer Strohmeyer
Recipe type: Dessert

Ingredients
  • 1 pint of fresh strawberries, washed and dried
  • 1 pint of fresh blueberries, washed and dried
  • 1 cup cashew date cream (recipe follows)

Instructions
  1. Cut a thin slice from bottom of strawberries so they stand upright. Remove tops of strawberries with a paring knife and gently scoop out some of the inside of the strawberries. Another option is to not cut off the top off the strawberries, but cut the strawberries from the top into wedges, like a + sign ( but not all the way through).
  2. Use a pastry bag with a decorative tip, or fill a zip lock bag with one corner cut off with cashew date cream.
  3. Fill the strawberries with the cream and top with a blueberry. Cover and refrigerate until ready to use.
  4. Serve immediately on a pretty platter (strawberries will get mushy if you make too far ahead of time).

Notes
I couldn’t find my pastry bags and decorative tips so I had to resort to using a ziplock bag to fill my strawberries. They would look a little fancier using a decorative tip, but I still think they look beautiful without, so don’t worry if you don’t have this. I also left the bottoms on my strawberries because they all stood nicely on their own ( I guess I got lucky). This serves 4 people, so double it up for larger crowds.

3.2.1753

Cashew Date Cream
 

Print

Author: Jennifer Strohmeyer
Recipe type: Dessert
Serves: 1 cup

Ingredients
  • 1 cup raw cashews, soaked in cold water for 4 hours
  • 1 cup pitted dates, preferably Medjool, soaked in cold water for 4 hours
  • 1 tbsp pure vanilla extract
  • 1-2 pinches ground cinnamon, to taste
  • Non-dairy unsweetened vanilla milk, for thinning

Instructions
  1. Soak cashews and dates separately in cold water for 4 hours.
  2. Drain cashew and dates. Add dates, cashews, vanilla and cinnamon to high-powered blender or food processor fitted with S-shaped blade.
  3. Puree until creamy and smooth adding a tiny bit of non-dairy milk if too thick.
  4. Chill in Refrigerator minimum 1 hour or until ready to use.

3.2.1753

Enjoy!


Jennifer

Filed Under: Desserts Tagged With: vegan dessert

Baked Eggplant Fries with Lemon Dill Dipping Sauce

June 14, 2011 By Jennifer


DSC_0427-1

My children love french fries, what kid doesn’t? Okay, and I confess so do the adults around our house. I prefer to make mine at home so I can make sure they are not deep fried in unhealthy oils and loaded with sodium.

I have been dreaming about making these eggplant fries for a couple of weeks now. I have had zucchini fries at restaurants in the past and considered making that – I will definitely be trying those out since these came out perfect. If you have had zucchini fries at a restaurant you know that they are deep fried and definitely not healthy. I hate to think all the nutritional benefits of vegetables are just destroyed by deep-frying and dumping huge amounts of salt on them. I personally don’t think that even tastes good anymore. I want to taste my food and not salt, butter, or oil – how about you?

I love eggplant because it is downright delicious and it’s such a versatile vegetable that can be cooked in so many ways. It is also an important antioxidant vegetable that makes a wonderful addition to your diet. It is loaded with vitamin A, B, C folate and minerals like potassium. It is rich in dietary fiber, contains no fat and is low in calories. How perfect, right?

I did a quick search for eggplant fries to see what delicious recipes were out there. Most were deep fried like I thought they would be, but I did find a great one at Dianne’s Dishes. I used her method for cutting the fries because I definitely needed a visual on that – check it out. Thank you Dianne for this and for my recipe inspiration.

Baked Eggplant Fries with Lemon Dill Dipping Sauce
 

Print

Prep time
10 mins

Cook time
15 mins

Total time
25 mins


Author: Virtually Vegan Mama
Recipe type: Appetizer, Side
Serves: 6

Ingredients
  • For fries:
  • 1 eggplant, cut into strips
  • ⅓ cup unsweetened plain soy yogurt
  • 1 tbsp. dried parsley
  • ¼ tsp. garlic powder
  • ¼ tsp. paprika
  • ¼ tsp. ground cumin
  • ¼ tsp. onion powder
  • 2 tbsp. fresh lemon juice
  • 2 tbsp. apple cider vinegar
  • 2 cups whole-wheat seasoned breadcrumbs
  • For dip:
  • 1 cup unsweetened plain soy yogurt
  • 1 tsp. dill
  • 2 cloves garlic, minced
  • 2 tbsp. lemon juice
  • Fresh black pepper to taste

Instructions
  1. For fries:
  2. Preheat oven to 450 degrees. Line two large baking sheets with a non-stick baking mat or parchment paper. Cut the top and bottom off of your eggplant. Cut the eggplant in half lengthwise and then into quarters. Next, cut the eggplant quarters into slices roughly ¼ in. thick. Now cut the eggplant slices into strips roughly the size of French fries. Combine yogurt, parsley, garlic powder, paprika, ground cumin, onion powder, lemon juice, and apple cider vinegar in a large bowl. Toss eggplant fries in soy yogurt mixture, coating evenly. Place breadcrumbs on a plate and lightly coat eggplant fries with breadcrumbs. Spread out evenly on trays making sure they don’t touch. Bake in preheated oven for 10-15 minutes or until golden brown and crispy. Turn halfway during baking to brown evenly. Serve immediately with lemon dill dipping sauce.
  3. For dip:
  4. Combine all ingredients in a medium-sized bowl. Place in the refrigerator for a minimum of 1 hour to chill and allow flavors to combine.

Notes
Without dip: 141 calories, 4.7 grams sugar, 1.3 grams fat, 28.3 grams carbohydrates, 5.9 grams protein For dip: You can add cut up cucumber to this to make it traditional Tzatziki Sauce.

2.2.6


Here’s a great review of Baked Eggplant Fries done by Healthy Girl’s Kitchen check it out!

Have you tries Baked Eggplant Fries before, what do you think?

Filed Under: Appetizers, Sides, Snacks Tagged With: appetizer, eggplant, fries

Strawberry Rhubarb Smoothie

June 6, 2011 By Jennifer

strawberryrhubard1
I’ve started writing a monthly vegan recipe column for One Green Planet. One Green Planet is an online ecosystem that draws links between the world of ecology, the environment and vegan living. We are a platform that brings together a range of distinct voices, unified by a commitment to spreading good ideas that benefit people, animals and the planet. I am honored and thrilled to join the ranks of so many prominent contributors.
It’s rhubarb season and if you visit your local farmer’s market right now I’m sure you will find plenty of this antioxidant-rich vegetable there. My last visit to our local market showcased some fresh and beautiful rhubarb.

Morning smoothies are a daily ritual in our home. My three year old helps make them, while my 18 month old tugs at my leg in anxious anticipation. Smoothies are a delicious and easy way to get in your daily fruits and vegetables. Rhubarb was the perfect choice for this dessert-style smoothie because it provides a good source of vitamin c, calcium, and fiber.

This smoothie is light and frothy, while offering the perfect balance of tart and sweet.

Ingredients:

  • 1 cup fresh rhubarb, chopped
  • ½ cup orange juice
  • 1 tbsp date syrup, pure maple syrup or 2-3 dates
  • ½ tbsp pure vanilla extract
  • 1 cup fresh strawberries, sliced
  • ½ cup frozen strawberries
  • 1 fresh banana
  • 12 oz unsweetened vanilla non-dairy milk of choice
  • 1 pinch ground cinnamon
  • 1 tbsp ground flaxseed

Preparation:

  1. Combine chopped rhubarb, orange juice, date syrup, vanilla and cinnamon in a small saucepan. Bring to a boil, reduce heat to low and simmer uncovered for five minutes.
  2. Set aside to cool slightly and place in refrigerator to chill for 30 minutes (this can be done ahead of time and you can make more so you can enjoy this all week long).
  3. Combine all ingredients in a blender. Puree until smooth and serve.

Enjoy!

Please visit the following link to read more:

Strawberry Rhubarb Smoothie

Enjoy and have a great day!

Filed Under: Drinks and Smoothies

Black Bean Apple Burgers with Caramelized Onion Chipotle BBQ Sauce and Shiitake Bacon

May 29, 2011 By Jennifer

blackbeanburgers

It’s BBQ season and what better way to celebrate this Memorial Day weekend with these healthy and delicious Black Bean Apple Burgers. I’ve had this BBQ sauce recipe filed away since I created it in January and I’ve been counting the days until the nice weather arrived to use it. This was my first attempt at a healthy, fakin’ bacon recipe and I am happy with the way it came out. I definitely want to experiement with different ways of making it to find the best one. If you have a recipe perfected, please share it with me.

The flavors of each recipe combine for the perfect sweet, spicy, and earthy summer meal.

* Note: I would make the BBQ sauce ahead of time. Also, when there is ten minutes left on the mushrooms, throw the burgers in the oven to finish them off.

Black Bean Apple Burgers with Caramelized Onion Chipotle BBQ Sauce and Shiitake Bacon


Yield: 4 servings

Ingredients:

1 (15.5) oz. can no or low sodium black beans, drained and rinsed with cold water

½ cup apple, peeled and diced

½ cup cornmeal

3 cloves roasted garlic

¼ tsp cumin

¼ tsp black pepper

½ tsp onion powder

2 tbsp lemon juice

4 whole wheat or gluten-free buns

Directions:


1.    Preheat oven to 400 degrees F.

2.    Place all ingredients in a food processor with an S-shaped blade and process until well combined.

3.    Form burgers into four equal patties and place in refrigerator for one hour.

4.    Heat a non-stick skillet over medium-heat. Spray with non-stick cooking oil and cook each patty for 4 minutes on each side or until browned and crispy. Place in oven for an additional 4 minutes per side.

5.    Serve on rolls with sliced tomato, lettuce, BBQ sauce and Shiitake Bacon. Or, serve with a big green salad without a roll – that’s how I had it.

* I kept the seasoning mild in these because I serve them to my kids, but you can always get creative and throw some other one’s in there if you want. The best part about making veggie burgers is you can taste the uncooked batter and adjust the taste to your liking. 😉 However, the Chipotle BBQ Sauce added enough kick that you might just want to leave them alone.
Caramelized Onion Chipotle BBQ Sauce
bbqsauce


Yield: 1 ½ cups

Ingredients:


1 large yellow onion, cut in half and thinly sliced

3 cloves roasted garlic

1 tbsp date paste

2 tbsp apple cider vinegar

3 tbsp no or low sodium tomato paste

1/3 cup low sodium ketchup

¼ tsp ground mustard

¼ – ½ tsp chipotle powder (adjust to taste)

1 tbsp vegan Worcestershire sauce

¼ cup chopped fresh cilantro

1 cup water

Directions:


1.    Heat a skillet over medium heat.  Add diced onions and stir. Keep stirring until the onions start to stick and add 1 tablespoon of vegetable stock. Repeat this step, stirring often for 30 minutes, deglazing pan every so often with a small amount of vegetable stock. Cook onions for 30 minutes or until onions are dark in color with the desired caramelized flavor.

2.    Place onions with remaining ingredients in a blender or food processor with an S-shaped blade and process until smooth.

3.    Transfer to a container and chill in the refrigerator until ready to use.


Shiitake Bacon

Ingredients:

1 (3.5) oz container shiitake mushrooms, stems removed and sliced

1 tbsp Bragg Liquid Amino Acid

¼ cup no salt added vegetable stock

Directions:


1.    Combine mushrooms, Bragg’s and veggie stock in a shallow bowl. Marinate for one hour, stirring once after 30 minutes.

2.    Preheat oven to 400 degrees F. Line a baking sheet with a nonstick baking mat or parchment paper. Spread mushrooms onto baking sheet and roast for 40 minutes until crispy.

* make sure you get these nice and crispy otherwise it will just be roasted mushrooms. Increase your oven temp if you need to or throw on the broiler for a few minutes to crisp. =)
Enjoy!

Filed Under: Entrees Tagged With: BBQ, black beans, burgers, veggie burgers

Cherry Almond Coconut Macaroons

May 11, 2011 By Jennifer

untitled (16)
I had this recipe filed away and planned on posting it eventually. I decided to pull it out – and what a perfect time to do so – since I was forwarded a twitter link to an article on Dr. Fuhrman’s Blog about the health benefits of eating cherries. Cherries not only boast a distinctive flavor – ranging from sweet to tart – but this high-antioxidant fruit will help reduce inflammation, pain and may help you get a good night’s sleep. You can check out the full article here Diseaseproof.
These Cherry Macaroons are slightly tart, creamy, and nutty with a natural sweetness that keeps you coming back for more. These are also incredibly easy to make, it’s a perfect treat to make when you don’t have much time to spend in the kitchen. I thought they tasted great before, but somehow got even better after reading this article. I know you will enjoy eating this good-for-you treat as much as my family and I did.
I made another fruit paste as part of my growing fruit paste experiments. The dried cherries I used are slightly tart and I am really happy about the flavor they give these macaroons. However, if you prefer a sweeter variety try a differnet type of cherry. I definitely want to start macerating my fruits – without refined sugar of course – to try out in some healthy dessert recipes in the future.
These are nutrient-rich and delish, enjoy!
Cherry Almond Coconut Macaroons
Prep time: 10 minutes
Total time: 30 minutes
Yield: Makes 20
Ingredients:
¼ cup light coconut milk
1 ½ cup unsweetened shredded coconut
¼ cup raw almonds
¼ cup date syrup Organics are for Everyone Date Syrup
3 tbsp cherry paste
1 tsp pure vanilla extract
1 tsp almond extract
3 tsp  Ener-G Egg Replacer mixed with 4 tbsp warm water (replaces 2 eggs)
Directions:
1.  Preheat oven to 350 degrees F. Line a baking sheet with a nonstick baking mat or parchment paper. Place all ingredients in a food processor with an S-shaped blade and process until well combined.

2.  Form mixture into 1 tablespoon mounds onto lined baking tray, 2 inches apart. Bake macaroons for 15 minutes or until golden brown on bottom and edges.

3.  Let cool on sheet for 5 minutes. Transfer to wire racks, and cool completely.
4.  Store in airtight container for up to a week.
Cherry Paste
Yield: About 1 cup
½ cup unsweetened dry cherries
Water for soaking
Directions:
1.  Cover cherries with cold water and soak for 4 hours.
2.  Remove cherries and reserve water. Place cherries in blender or Cuisinart and process until smooth (I like to use my Cuisinart Mini Prep for this). Adjust consistency with some of the reserved water, if needed.

3.  You can store cherry paste in an airtight container in a refrigerator for up to two weeks. Use as needed.


Filed Under: Desserts

Portobello Wellington

May 2, 2011 By Jennifer

Portobello Wellington
with Shiitake Duxelle, Vanilla Glazed Baby Carrots and Roasted Red Potatoes
Portobello Wellington with Shiitake Duxelle, Vanilla Glazed Baby Carrots and Roasted Red Potatoes
It was finally time to plan out a Vegan Dinner Menu to show all you doubters out there – you know who you are – that gourmet vegan is not only possible , but can stand up to its non-vegan counterparts. This recipe is only the beginning – I have so many recipes swimming through my head.  I even got someone who would never eat a mushroom to devour this – literally lick their plate clean – you know you have done it when that happens. This meal could not have come out any better and was well worth the planning and preparation. My old friend Beef Wellington can take a back seat to my new vegan version. Say hello to Portobello Wellington!
This dish is earthy, naturally sweet and full of flavor. Make this for your next dinner party and you will be sure to impress your friends.
Thank you to Tyler Florence’s Ultimate Beef Wellington recipe for baking times and duxelle inspiration.
This recipe is pretty easy to make as you can see.
Blend up your ingredients for the duxelles…
duxelle

Add the mixture to a large sauté pan with a small amount of butter and veggie stock and cook for 10 minutes…

duxellepan

Slice your pastry into four equal parts…
pastry

Using a spoon, cover each mushroom with a layer of the duxelles…

stuffinf

Place a mushroom in center of each pastry sheet, cavity side up…

stuffing2

Fold pastry around the mushrooms and enclose entirely, press down lightly with fingers to make sure it is sealed tight.

wrapped

Place mushrooms, with folded side down, on baking tray lined with parchment paper or non-stick baking mat…

 glazed

Bake mushrooms in oven until pastry is golden brown for 20-25 minutes…

 baked

Serve with roasted red potatoes, glazed baby carrots and drizzle with red wine reduction…

5.0 from 2 reviews

Portobello Wellington with Shiitake Duxelle, Vanilla Glazed Baby Carrots and Roasted Red Potatoes
 

Print

Prep time
25 mins

Cook time
1 hour

Total time
1 hour 25 mins


This dish is earthy, naturally sweet and full of flavor. Make this for your next dinner party and you will be sure to impress your friends.
Author: Jennifer Strohmeyer-Virtually Vegan Mama
Recipe type: Entree
Serves: 4

Ingredients
  • 4 Portobello mushrooms
  • 1 sheet vegan puff pastry (Aussie Bakery All Natural Puff Pastry Sheets)
  • 3½ ounce(s) of shiitake mushrooms
  • 1 cup(s) of white button mushrooms
  • 2 cup(s) of baby spinach
  • 3 small shallots, peeled and roughly chopped
  • 3 cloves garlic, peeled and roughly chopped
  • 2 sprigs fresh tarragon, stemmed
  • 6 red potatoes, cut into ½ inch pieces
  • 1 tbsp. of minced fresh parsley
  • 8 ounce(s) of baby carrots
  • ½ cup(s) of red wine
  • 1¾ cup(s) of no salt added vegetable stock
  • 3 tsp. of vegan butter
  • 2 tbsp. of date syrup
  • ¼ tsp. of pure vanilla extract
  • 2 pinch of freshly ground black pepper
  • 1 tsp. of olive oil

Instructions
  1. Preheat oven to 400 degrees F.
  2. For the Red Wine Sauce: Combine ½ cup red wine and 1 cup vegetable stock in small saucepan. Simmer uncovered for 20 minutes. Stir in 1 tbsp date syrup and set aside. Reheat on low right before serving and drizzle over Wellington’s.
  3. For the Roasted Red Potatoes: Combine potatoes, olive oil, ¼ cup vegetable stock, fresh parsley and black pepper in a small Pyrex or roasting pan and toss to coat potatoes. Roast 40 minutes or until tender and golden brown. Add extra vegetable stock if needed and stir occasionally to prevent sticking/burning.
  4. For the Duxelles: Add spinach, shiitake, button mushrooms, shallots, garlic, and tarragon to a food processor and pulse until finely chopped. Add 2 tsp. Earth Balance Butter to a large sauté pan and set over medium heat. Add the mushroom mixture, ¼ cup vegetable stock and sauté for 10 minutes until most of the liquid has evaporated. Season with a pinch of black pepper and set aside to cool.
  5. For the Glazed Baby Carrots: Combine 1 tbsp date syrup, vanilla and ⅓ cup vegetable stock in small bowl, stir to combine. Melt 1 tsp. Earth Balance butter to a large sauté pan over medium heat. Add carrots and sauce; simmer on medium heat until carrots are cooked through about 20 minutes. Deglaze the pan with more vegetable stock if needed.
  6. For the Portobello Mushrooms: Gently scrap gills from Portobello mushrooms with a spoon. Place mushrooms on baking tray lined with parchment paper or non-stick baking mat. Bake in preheated oven for 10 minutes, set aside. Cut pastry sheet into 4 equal parts.Using a spoon, cover each mushroom with a layer of duxelles (make sure to fill the back cavity of the mushroom with the duxelles).
  7. Place a mushroom in center of each pastry sheet, cavity side up. Fold pastry around the mushrooms and enclose entirely, press down lightly with fingers to make sure it is sealed completely.Place mushrooms, with folded side down, on baking tray lined with parchment paper or non-stick baking mat. Bake mushrooms in 400 degree oven until pastry is golden brown for 20-25 minutes.

3.2.2208

You can serve this with any sides of  your choosing. Any way you choose this recipe will be a hit for sure!

xoxo,

Jennifer

Filed Under: Entrees Tagged With: baby carrots, entertaining, glazed baby carrots, holidays, portobello wellington, roasted potatoes, vegan, vegan dinner party, vegan wellington, vegetarian, wellington

Acai Berry Tart

April 24, 2011 By Jennifer

untitled (35)
This is a slightly revamped version of my delicious Berry Pie recipe. I volunteered to bring dessert for Easter Sunday and my mother-in-law – this is her favorite – ­ is happy to know this Berry Tart will be showing up. When I originally made this I used my ceramic pie dish knowing I wanted this to be a tart from the beginning and of course min-tarts for a dinner party. I’m just going to buy those cute things instead of waiting for my birthday because you know I love making all things mini. Mini-treats of all kinds just taste better to me – so cute and delish. With mini-desserts, I can have my beloved treat and most importantly, not overindulge. I had this ceramic tart dish sitting in a box and had completely forgotten about it – you see it was packed away in the basement from our move. I was elated when I found it recently and couldn’t wait to make this again. It looks way prettier this time, don’t you agree?
untitled (36)
The recipe is basically the same as the original. This time I only mixed blueberries into the pie filling and saved the strawberries for decorating. I would also like to add kiwi and/or raspberries to this next time. You can substitute your favorite nut for the crust if you don’t like almonds. Pecans would be awesome in this, or you can use mixed nuts as well.
This tart has a creamy, irresistible texture with just the right amount of natural sweetness that will have you going back for seconds – you might even have to hide the leftovers for yourself. This Berry Tart is also antioxidant rich and full of many health benefits – you wouldn’t see a recipe here that wasn’t great tasting and also great for you. All in all, this tart is completely fabulous.
I can’t wait for everyone to dig into this berry tart today. I encourage everyone reading this to make this, you will not be disappointed. This has been added to my go-to dessert recipe and it will probably be added to yours.

No Bake Date Almond Tart Crust

Ingredients:

1 cup raw almonds
¼ cup unsweetened shredded coconut
1 cup pitted dates (preferably medjool dates), soaked in cold water for 30 minutes (skip this step if dates are aready super moist, I usually need to rehydrate my dates because of where I live)
2 tbsp date syrup Organics are for Everyone Date Syrup

Directions:

1.    Place the almonds in a food processor with an S-shaped blade and process until it reaches a crumbly consistency. Drain dates and add to food processor with coconut, date syrup and process until the dates are broken down and mixed in well with other ingredients. It should be a thick paste-like mixture.

untitled (41)


2.   To shape the crust, place crust mixture into a tart pan and shape and mold the crust to the pan with fingers.

untitled (38)

3.   Chill the crust in the refrigerator for an hour or until ready to use.

Acai Berry Tart Filling

3 1/2 cups blueberries

1 1/2 cup sliced strawberries

1 (3.5 oz) defrosted package unsweetened Acai smoothie pack (I use Sambazon which I buy at Whole Foods in the freezer section)

¼ cup date sugar Aunty Patty’s Organic Date Sugar

¼ cup light coconut milk

2 tbsp pure vanilla extract

2 tbsp fresh lemon juice

3 tbsp tapioca flour

Directions:

1.  Place 2 cups blueberries, defrosted acai pack, date sugar, coconut milk, vanilla, lemon juice, and tapioca flour in food processor with S-shaped blade and process ingredients until smooth. 

untitled (39)

2.   Place berry tart filling in small saucepan and heat on low to medium-low heat stirring constantly for 3-5 minutes until it thickens to a consistency of pudding. Tart filling should be nice and thick. Allow pie filling to cool completely.

To assemble pie:

1.   Add 1 cup blueberries to saucepan and fold into pie filling until combined.

2.   Pour tart filling into prepared tart pan and top with remaining blueberries and sliced strawberries.

3.   Place in the refrigerator to set for minimum 1 hour or until ready to serve. This can be made a day  ahead.

Nutrient-rich and delish. Enjoy!


untitled (40)
* Note: This crust is a raw crust and will not be the same consistency of a baked crust. When serving, run a knife along the edge of the tart and remove slices with a pie server. Should hold together quite nicely. This would probably work really well in a tart pan with a removeable bottom. When I get one I will try that!

Filed Under: Desserts

  • « Previous Page
  • 1
  • …
  • 6
  • 7
  • 8
  • 9
  • 10
  • Next Page »

Copyright Pure Thyme, LLC© 2026


Loading Comments...